Difference between revisions of "Development:EclipseJalview"
From Jalview Wiki
(Created page with " == Jalview Eclipse IDE installation and setup guide == Jalview IDE is Eclipse + EGit plugin. You'll find detailed EGit installation instructions at http://www.vogella.com/a...") |
(→Creating the local repository) |
||
| Line 13: | Line 13: | ||
First step is to create a local repository to host our remote repository copy. To do that, follow these steps: | First step is to create a local repository to host our remote repository copy. To do that, follow these steps: | ||
# File -> New -> Other | # File -> New -> Other | ||
| + | [[File:Image001.png]] | ||
# Tell the wizard you want to create a Git repository: | # Tell the wizard you want to create a Git repository: | ||
| + | [[File:Image003.png]] | ||
# And also where the local repo will be hosted and how you want to call it: | # And also where the local repo will be hosted and how you want to call it: | ||
| + | [[File:Image004.png]] | ||
# Then click Finish and that’s all. | # Then click Finish and that’s all. | ||
| − | |||
== Remote repository cloning == | == Remote repository cloning == | ||
Revision as of 06:59, 8 July 2014
Jalview Eclipse IDE installation and setup guide
Jalview IDE is Eclipse + EGit plugin. You'll find detailed EGit installation instructions at http://www.vogella.com/articles/EGit/article.html.
In this guide, we’ll show how to clone Jalview remote code repository in to our local repository. For further details about how to work with Git, please visit specialized documentation. It’s better than reinvent the wheel.
We’ll also suppose you’ve already installed Git for Eclipse (EGit), which is out of the scope of this tutorial.
Creating the local repository
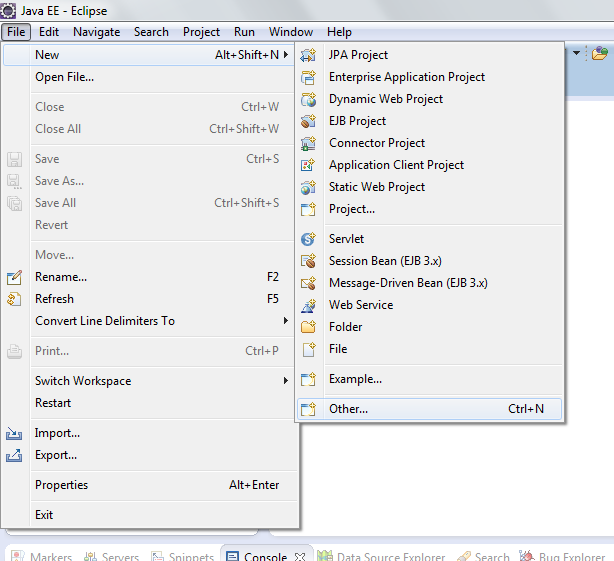
First step is to create a local repository to host our remote repository copy. To do that, follow these steps:
- File -> New -> Other
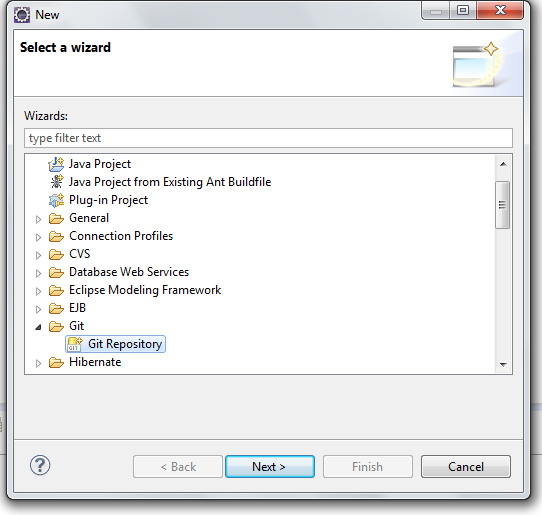
- Tell the wizard you want to create a Git repository:
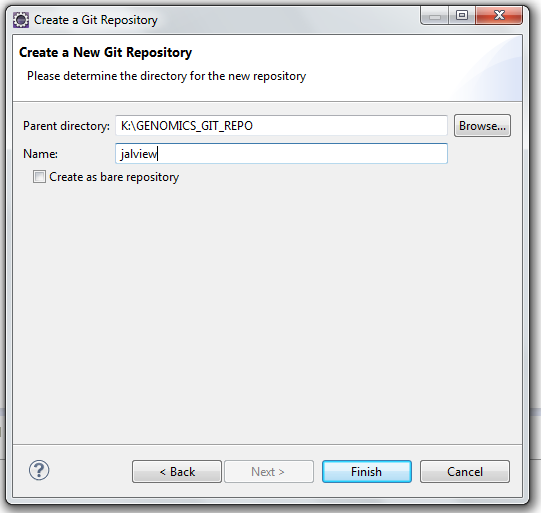
- And also where the local repo will be hosted and how you want to call it:
- Then click Finish and that’s all.
Remote repository cloning
- File -> Import -> Project from GIT and choose URI repo:
- Figure 1. File -> Import.
- Figure 2. Importing a Project from a GIT repo.
- Then type Jalview Git repo URI:
https://source.jalview.org/git/jalview.git
- Introduce your authentication information (the one you use to access Jira) and leave the rest of the inputs to be filled automatically. After press Finish the following screen will be displayed:
- Figure 3. Branch selection fetching.
- Once all the branches have been fetched, you’ll have to use the ones you want to clone locally. By default, all branches will be cloned. We’ll recommend leaving this unmodified. Make your selection and click Next.
- Specify where you want to clone remote repository at and the click Next:
- Wait until the ckeckout has been completed:
- Select the wizard you want to use to create the project.
- Click Next -> Next -> Finish and your repo will be cloned.
And that's all.


